For any home project, be certain to follow local code and permitting requirements.
© 2022 Trex Company, Inc.
01. Intro
02. Determine Functional Areas of the Deck
03. Framing Considerations
04. Installing Joists
05. Transition Box Step

Step-by-Step Instructions
- 01: Planning Multi-Level Deck →
- 02: Transition Box Installation →
Chapter 01: Planning Multi-Level Deck
Print This Chapter
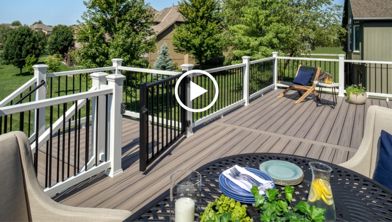
So you're ready to get started? Watch our how-to tutorial before you start your build.
Before you begin any DIY project, make sure to wear the appropriate personal safety equipment. Eye protection, ear protection, gloves, long pants, a long-sleeved shirt, and reinforced toe shoes are recommended. Always make sure that you have a first aid kit nearby. For any home project, be certain to follow local code and permitting requirements.

For homeowners looking to add layers of design to their space, multi-level decks offer a functional and stylish solution. Multi-level decks create distinct spaces in your backyard, as each level can be used for a unique purpose such as entertainment, cooking, and smaller group sitting areas. If your yard is sloped, multi-level decks can also follow the slope of your yard by tiering up or down to match the ground level.
In this guide, we will walk you through the additional steps required to frame a multi-level deck. While the task of building a multi-level deck may seem more intimidating than a standard deck build, this guide simplifies the process and offers step-by-step help to make your next big project smooth sailing.
For a refresher on the deck framing basics, check out our guides on Deck Framing Layout, How to Install Deck Frame Beams and Posts, How to Install Deck Ledger Board and Attach Flashing, and How to Install Deck Joists. If you are unsure of any of those terms, here's a breakdown of all the parts of a deck.
Step 1: Decide if you are using a freestanding or connected deck framing approach.
The framing of each individual deck level can either be freestanding or connected. (Note: Depending on the rules of your local municipality, you may be required to use one connection type over the other.)
A freestanding deck, much like the name implies, means that the deck stands alone and is not attached to the other levels. In this instance, the different levels could be built as separate decks and finished one at a time.
Connecting the decks, on the other hand, means the framing from each level attaches to the next level. With the connected approach, the finished product would be completed after the framing is done for all levels.
Step 2: Decide if you want to build each level with a flush beam or a drop beam.
Depending on the design of your multi-level deck, you must determine if you will build each different level using a flush beam or a drop beam. Each of these options has its own benefits, so consider them carefully before making your choice:
Drop Beam:
- A drop beam can offer more design flexibility if you have enough room to fit the beam between the deck frame and the ground.
- A drop beam would be attached under the joists.
Flush Beam:
- A flush beam is used when the deck is very close to the ground.
- A flush beam will have the top of the joists flush with the top of the beam.

No matter which type of beam you choose, you will likely need to use an angle bracket. These brackets will allow the joist to sit in between and stay flush with the top of the beams while installing the joist hangers. An angle bracket can be attached to the top of the joist and hang slightly over the edge of the joist to leave room for the connecting beam. If an extra angle bracket is not available, a small scrap of wood can also be used.

Step 3: Build out your deck framing for each level
Once you have made your deck framing and beam installation decisions, build out the rest of your framing as you would for any single level deck using the instructions outlined in our guides:
Step 1: Determine if you need to add a transition box between your deck levels.
When the height between the two deck level frames is too high to only have one step down to the next deck, a transition box step — or a small, framed platform stacked on top of your deck to create a step — can reduce that distance and keep the step heights within code.
The box step can be used when there are two rises, one from the upper deck to the box and then a step from the box to the lower deck. If the height is more than two rises then you’ll need to use multiple box steps or stair stringers (i.e., structural support boards that run along the side or center of your stairs).
For a refresher on how to calculate the rise for your stairs, check out our stair installation instructions.

Pro Tip
If you’re planning to build multiple decks with multiple heights, try to make all of the steps the same height or close to the same height. This will provide consistency through the decks so one does not feel different than the others. In some instances, the step from one deck to the other will be short enough that you will not need to add a box step at all.

Step 2: Determine if you will install your transition box before or after the decking installation.
You can install a framed box step before or after the decking has been installed. If you opt to install your framed box step before the decking, proper blocking will need to be installed where all deck ends will be meeting the box step to support it on top of the frame.
If you decide to install a box step after adding your decking, you will not need to add blocking for your decking ends. However, support blocking will be required.

Step 3: Considerations for attaching your transition box
Small details are important when attaching the box step. You must first understand where the step is going to be located. The step could go flush with the end of the deck frame, which would require the fascia to be flush with the outside of the deck. In this case, the lines of the fascia would still show.
Step 4: Attach the transition box

- Verify that the box step splits the distance between the top deck and bottom deck evenly. Code states that steps cannot vary more than ¼” between each step and that the step cannot be less than 4” in height. Be sure to check with your local municipality to ensure your box steps are up to code before construction.
Pro Tip
Splitting the difference between the top and bottom deck evenly will ensure that there is little to no variance — keeping your step within code.

2. Attach the box step to the upper frame with 3” SDWS Framing screws from Simpson Strong Tie. Make sure to be high enough on the box step so the framing screw goes into the upper deck framing and predrill if you're closer to the edge.
3. Place a framing screw on each end and one in the middle.

4. Attach Simpson Strong Tie L70Z brackets to the front rim of the box step and down to the deck below with Simpson Strong Tie SD Connector screws. The bracket should be on top of the support blocking that is below the decking and the box step.
5. Place the L70Z’s on each end and one in the middle. This will keep the box step from moving around or raising up.

Once all of the necessary transition boxes are attached, your multi-level framing is complete.


Materials
3" SDWS Simpson Strong Tie Framing Screws
Simpson Strong Tie L70Z Brackets
Simpson Strong Tie SD Connector Screws


This content was partially or fully generated by AI and has been reviewed by our team to ensure accuracy and relevance.
(NOT ALL PRODUCTS ARE AVAILABLE IN EVERY COUNTRY.)

Copyright © 2026 Trex Company, Inc. All rights reserved.
Photos and videos © 2026 Warner Bros. Discovery, Inc. or its subsidiaries and affiliates. All trademarks are the property of their respective owners. All rights reserved.
- Country
-
Australia
-
Austria
-
Bahrain
-
Brazil
-
Canada English
-
-
Chile
-
Colombia
-
Costa Rica
-
Cyprus
-
Czech Republic
-
Fiji
-
France
-
Germany
-
India
-
Ireland
-
Israel
-
Kuwait
-
 Lithuania
-
Mexico
-
Netherlands
-
New Zealand
-
Norway
-
Oman
-
Qatar
-
Saudi Arabia
-
South Africa
-
Spain
-
Sweden
-
Switzerland
-
Turkey
-
United Arab Emirates
-
United Kingdom
-
United States
-
Venezuela
By choosing your country, you acknowledge that you have read Trex's Privacy Policy